| |
 |
 |
|
|
Tutorials
|
|
|
Blending/Layering/Masking Tutorial
|
How to turn a bunch of funky looking images into one big seamless collage
The application used in this example is: Photoshop 7.0
1) Preparations
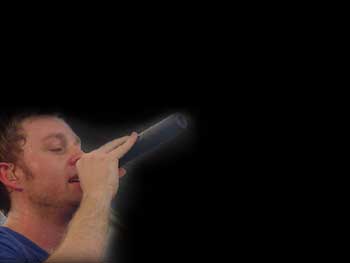
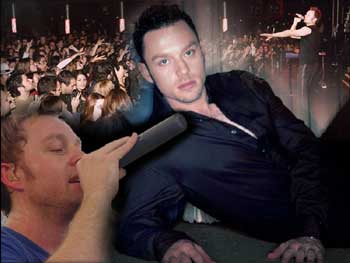
To prepare, create a new document in Photoshop and place (cut and paste) all of the images you want to use on new layers. One layer for each image. Spread them around using the move tool (V) to put them more or less where you wanted them to end up.
2.) Lasso & mask
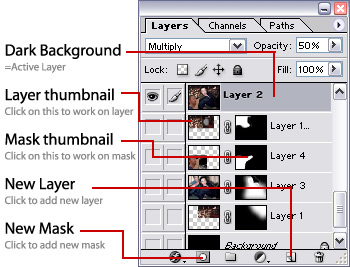
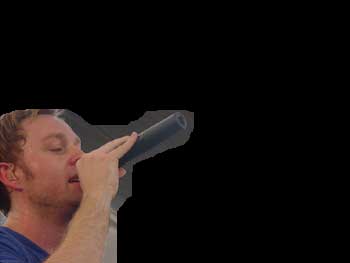
Activate the layer you want to start working with (preferably the one with the main image/biggest image), select the lasso tool (L) and draw a loop around the part of the image you want to keep, usually the person's face. Once you have the selection, make sure the layer youre working on is still activated and click the "add layer mask" button on the layers palette. This automatically hides everything in the active layer that *wasn't* selected, so you end up with something that looks like this
3.) Blur your mask
Make sure the mask is still activated and open the filter / blur / guassian blur dialog. Play around with the slider until the original edges of the image disappears.
4.) Finetuning
Select a largish soft-edged brush, size 50-100, flow 25%, color black, and paint on the mask where the edges are to sharp. Experiment! A black brush will erase the edges and a white brush will bring more of the original image back.
Repeated this on each layer. Dont erase to much of the background. For best result there should be something covering every inch of your canvas. This is your last chance to move your images around, so make sure you like the layout before you move on to the next step
5.) Filters
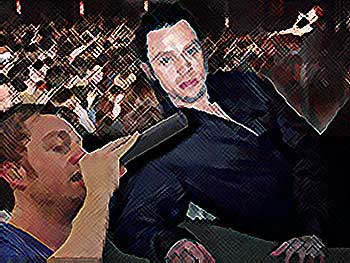
Now its time to stir things up a bit with some filter effects. Click on your top layer in the layer palette, and chose select all (ctrl A) to select the whole collage, then press shift ctrl C to copy and merge and ctrl v to paste a flattened version of your collage as a new layer on top of everything else.
As for the filters
In this example I used (Filter / Brush Strokes / Angled strokes) and (Filter / Brush Strokes / cross hatch) and (Filter / Noise / add noise). You can use basically any filter or combinations of filters that you want, as long as the colors in your collage stays somewhat intact . You're looking for something that will help you merge your collage into one big seamless image. Don't worry about messing up the details/faces, well take carre of that in the next step.
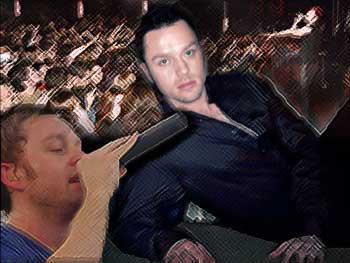
6.) Final mask
Now add a mask to the filtered layer. Use a really large soft-edged, black, brush at light flow (just like before) and brush the details/faces back into focus by painting over them on the mask. It can be a good idea to dab a bit here and there (for instance around the hair and clothes) to leave certain areas partially filtered. Adjust the opacity of the filtered layer somewhere around 50% (or whatever you think looks good). You could also try setting the filter layer to some other sort of mode, "screen" for example. You could also repeat this step over a few times, with different filters and different degrees of "bring back" the underlying layer's details.
Finishing touches
With that done, the next logical step would be to experiment with your color settings.
See the vibrant coloring tutorial for ideas
Good luck!
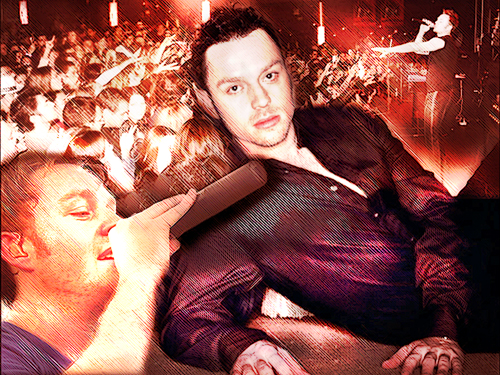
Click on the thumbnail to see the final result.
 |
08 Oct 2005 by nilam
|
0 comments
|
|
|
|
|